OpenID Connect Authentication
Canopy supports the Authorization Code Grant flow of OpenID Connect (OIDC) as specified in the OpenID Connect core v1.0 specification (https://openid.net/specs/openid-connect-core-1_0.html).
and the Client Credentials Grant flow as defined in Oauth 2.0 where access tokens are JWTs with the required claims. (https://tools.ietf.org/html/rfc6749#section-1.3.4)
This allows both users and other software to be granted access to Canopy via an OpenID Provider (OP).
User provisioning is enabled by default and claims that are mapped to user attributes will result in those attributes being updated.
Important Information
The Authorization Code Grant flow can only be used to create a normal cookie based session at this stage and token refreshing is not available.
As such the session timeout should be aligned with the access token lifetime.
Client Credentials Grant flow can be used by other software that needs to integrate with Canopy. The access tokens presented by such software must be valid JWTs with all the required claims.
Warning
The email attribute (via a claim mapping) is required for both flows.
Glossary
Word |
Description |
|---|---|
OIDC |
OpenID Connect |
OP |
OpenID Provider |
RP |
Relying Party |
Basic Configuration
Each OpenID Connect provider will require a slightly different configuration but the following entries will often be required.
All the required configuration is done in /etc/canopy/canopy.ini and a
restart of services is required for any change to take effect.
Required settings (customise values as required):
OIDC_ENABLE=trueOIDC_OP_AUTHORIZATION_ENDPOINT=https://OP_HOST/adfs/oauth2/authorize/OIDC_OP_TOKEN_ENDPOINT=https://OP_HOST/adfs/oauth2/token/OIDC_OP_USER_ENDPOINT=https://OP_HOST/adfs/userinfo# only required when OIDC_FETCH_USERINFO=trueOIDC_RP_CLIENT_ID=your_client_idOIDC_RP_CLIENT_SECRET=your_client_secretorOIDC_RP_CLIENT_ASSERTION_PEM=/path/to/cert.pemOIDC_ATTRIBUTE_MAPPING=name=unique_name,email=emailOIDC_OP_JWKS_ENDPOINT=https://ADFS_HOST/adfs/discovery/keys# By default RS256 is used
Settings that are often required:
OIDC_FETCH_USERINFO=false# When claims are sent via id_token/access_tokenOIDC_RP_SIGN_ALGO=RS256# ADFSOIDC_SSO_NAME=Our SSOSSO_USER_ROLE_MAPPING=Analysts=analysts
During initial configuration it would also be useful to increase the log level related to OIDC configuration:
LOG_LEVEL_OIDC=DEBUG
Warning
This setting may log sensitive information and should not be used in production except to debug specific issues for a limited time period.
Claim/Attribute Mapping
The OIDC_ATTRIBUTE_MAPPING controls how claims in tokens are mapped
to user attributes. Its value is a comma delimited list of attribute / claim
pairs.
OIDC_ATTRIBUTE_MAPPING=name=unique_name,email=email
maps the unique_name claim to the user attribute name and the
email claim to the email attribute.
Only mapped claims are evaluated and at least the email attribute
must be mapped to a claim that is the user’s email address.
Role assignment
- There are two ways user roles can be assigned via claims in tokens:
List claim that contains the complete role list
Claim per role
Both approaches form part of the OIDC_ATTRIBUTE_MAPPING setting and
can be used in combination (must be in the above order as set_roles
overrides any role mapping before it).
List claim
User roles can be sent via a list claim, the user’s roles will be reset to this list. If the complete list of user roles cannot be sent via a single list claim then per role claims will be required, possibly in addition to this.
The list roles attribute needs to be mapped to the set_roles field.
OIDC_ATTRIBUTE_MAPPING=name=unique_name,email=email,set_roles=groups
in the above example the groups claim is mapped to the set_roles
attribute.
Role name translation
Since the role names may not always match what Canopy expects, one can translate role names being sent via a list attribute using the SSO_USER_ROLE_MAPPING setting.
The mapping is a comma delimited list of OP Role Name = Canopy Role Name
SSO_USER_ROLE_MAPPING=OPRoleName=canopy_role_name1, OPRoleName2=canopy_role_name2
This setting will apply role translation to all SSO methods.
Supported Roles
- All builtin and custom roles are supported, the builtin list of roles is:
admintechnical-managerssenior-analystsanalystsschedulerssales-managersaccount-managerskb-adminspr-reviewersqa-reviewers
For custom roles their name will be used which is case sensitive.
Claim per role
Assigning roles based on claims is optional and not all flags need to be mapped. Unmapped flags can be managed via the Canopy admin interface. The attribute value should be any string value to signify membership, except for the following strings, which denote the removal of the role: ‘’ (Empty string), ‘no’, ‘false’ and ‘0’.
If the attribute is missing then no adjustment will occur.
- Role fields currently supported:
is_adminis_technical_managersis_senior_analystsis_analystsis_schedulersis_sales_managersis_account_managersis_custom_pr_reviewersis_custom_qa_reviewers
OIDC_ATTRIBUTE_MAPPING=email=email,name=name,is_admin=oidc_admin_claim
if per attribute role mappings are in use with list claim role mapping then the role flags should be after the set_roles mapping.
OIDC_ATTRIBUTE_MAPPING=email=email,name=name,set_roles=roles_claim,is_admin=admin_claim
Note
Per role claims do not support custom roles.
How to configure Microsoft Entra ID
Step 1 - Create an App Registration
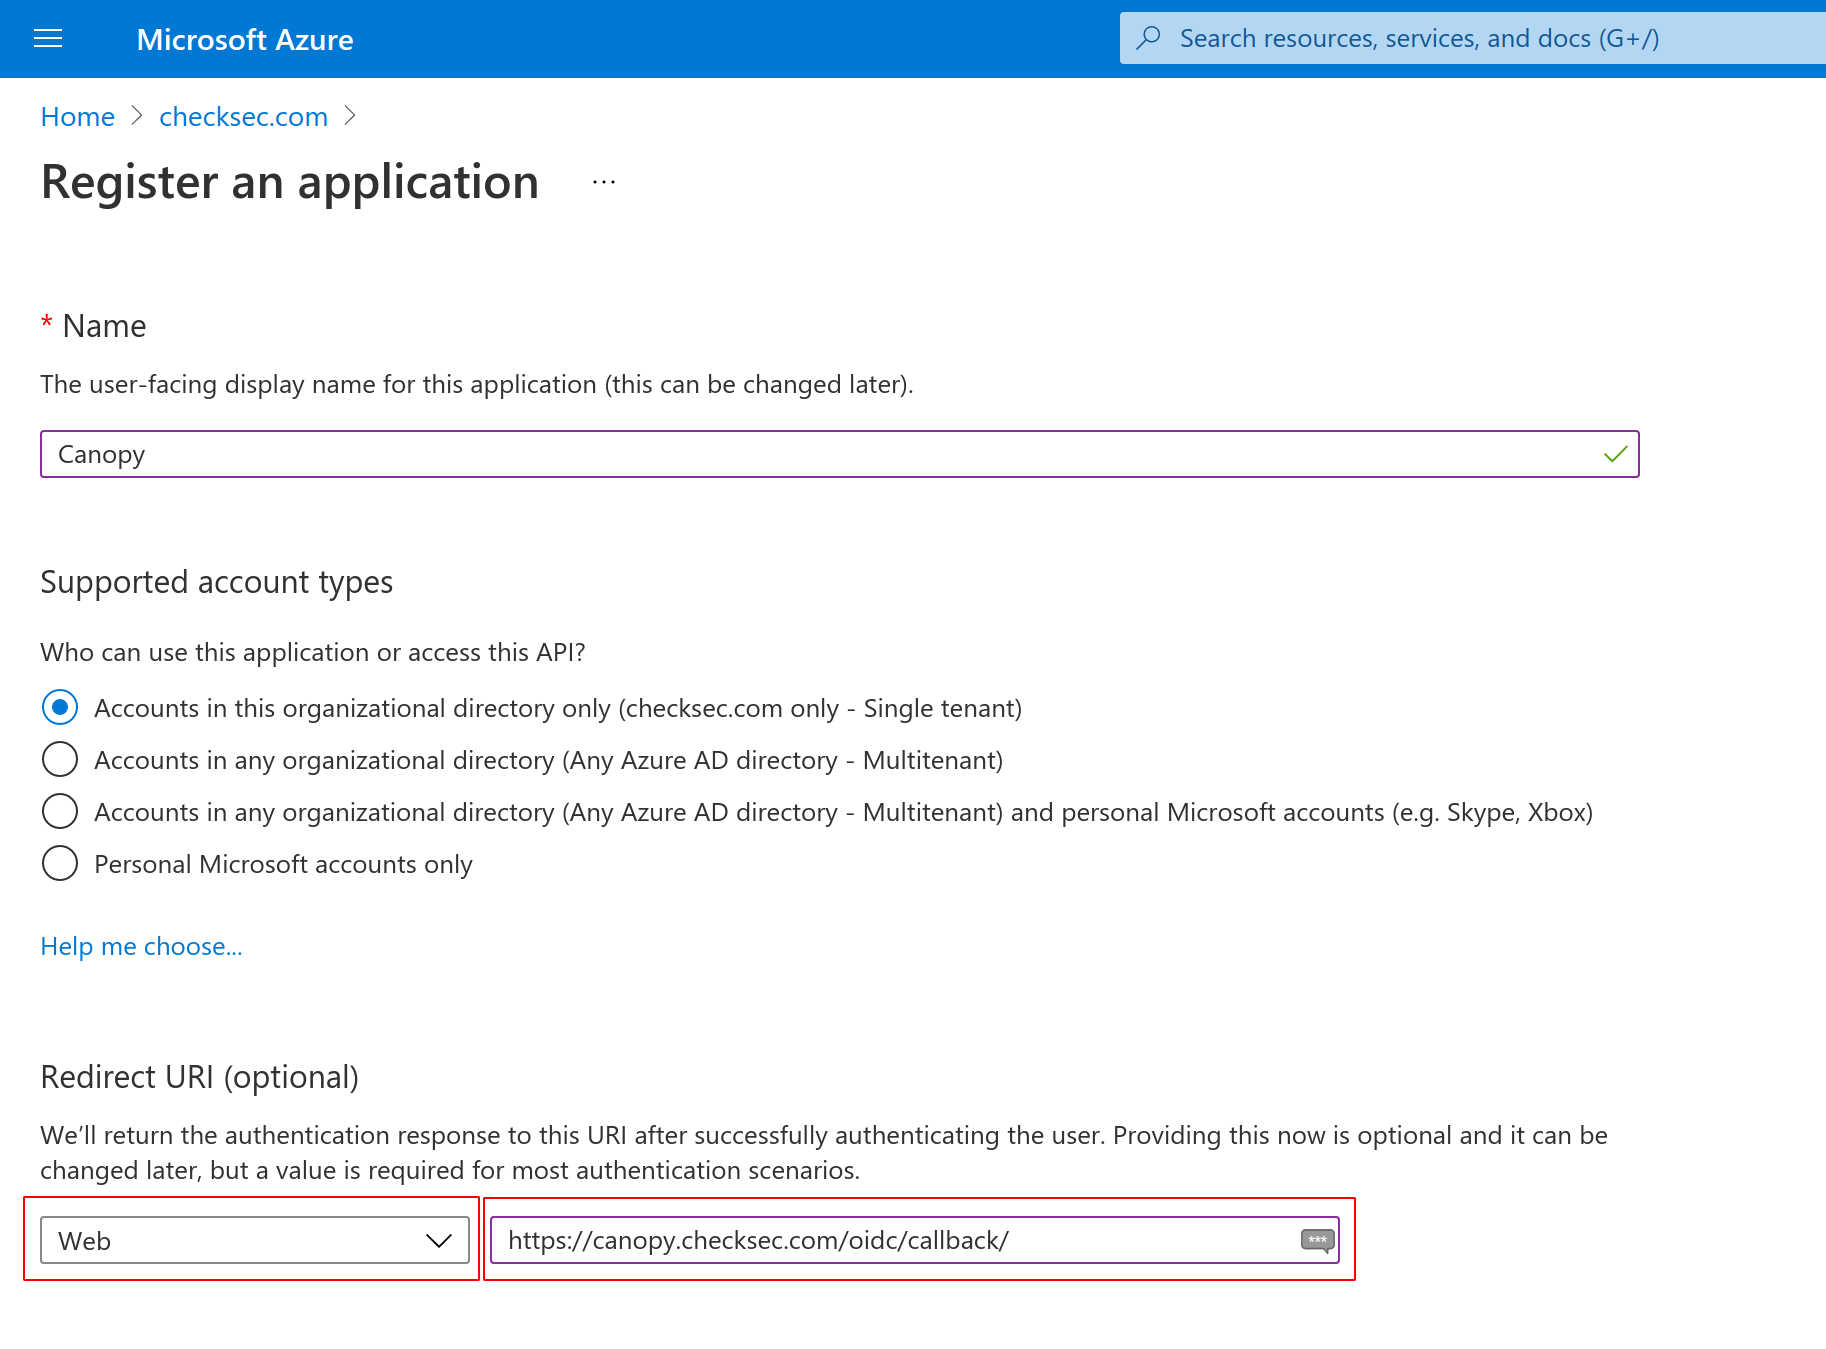
Log into Azure portal and navigate to the “Entra ID” section. In this section select the “App Registrations” subsection and create a new registration for Canopy.
Set the Redirect URI to https://<YOUR_CANOPY_URL>/oidc/callback/
Step 2 - Create a client secret
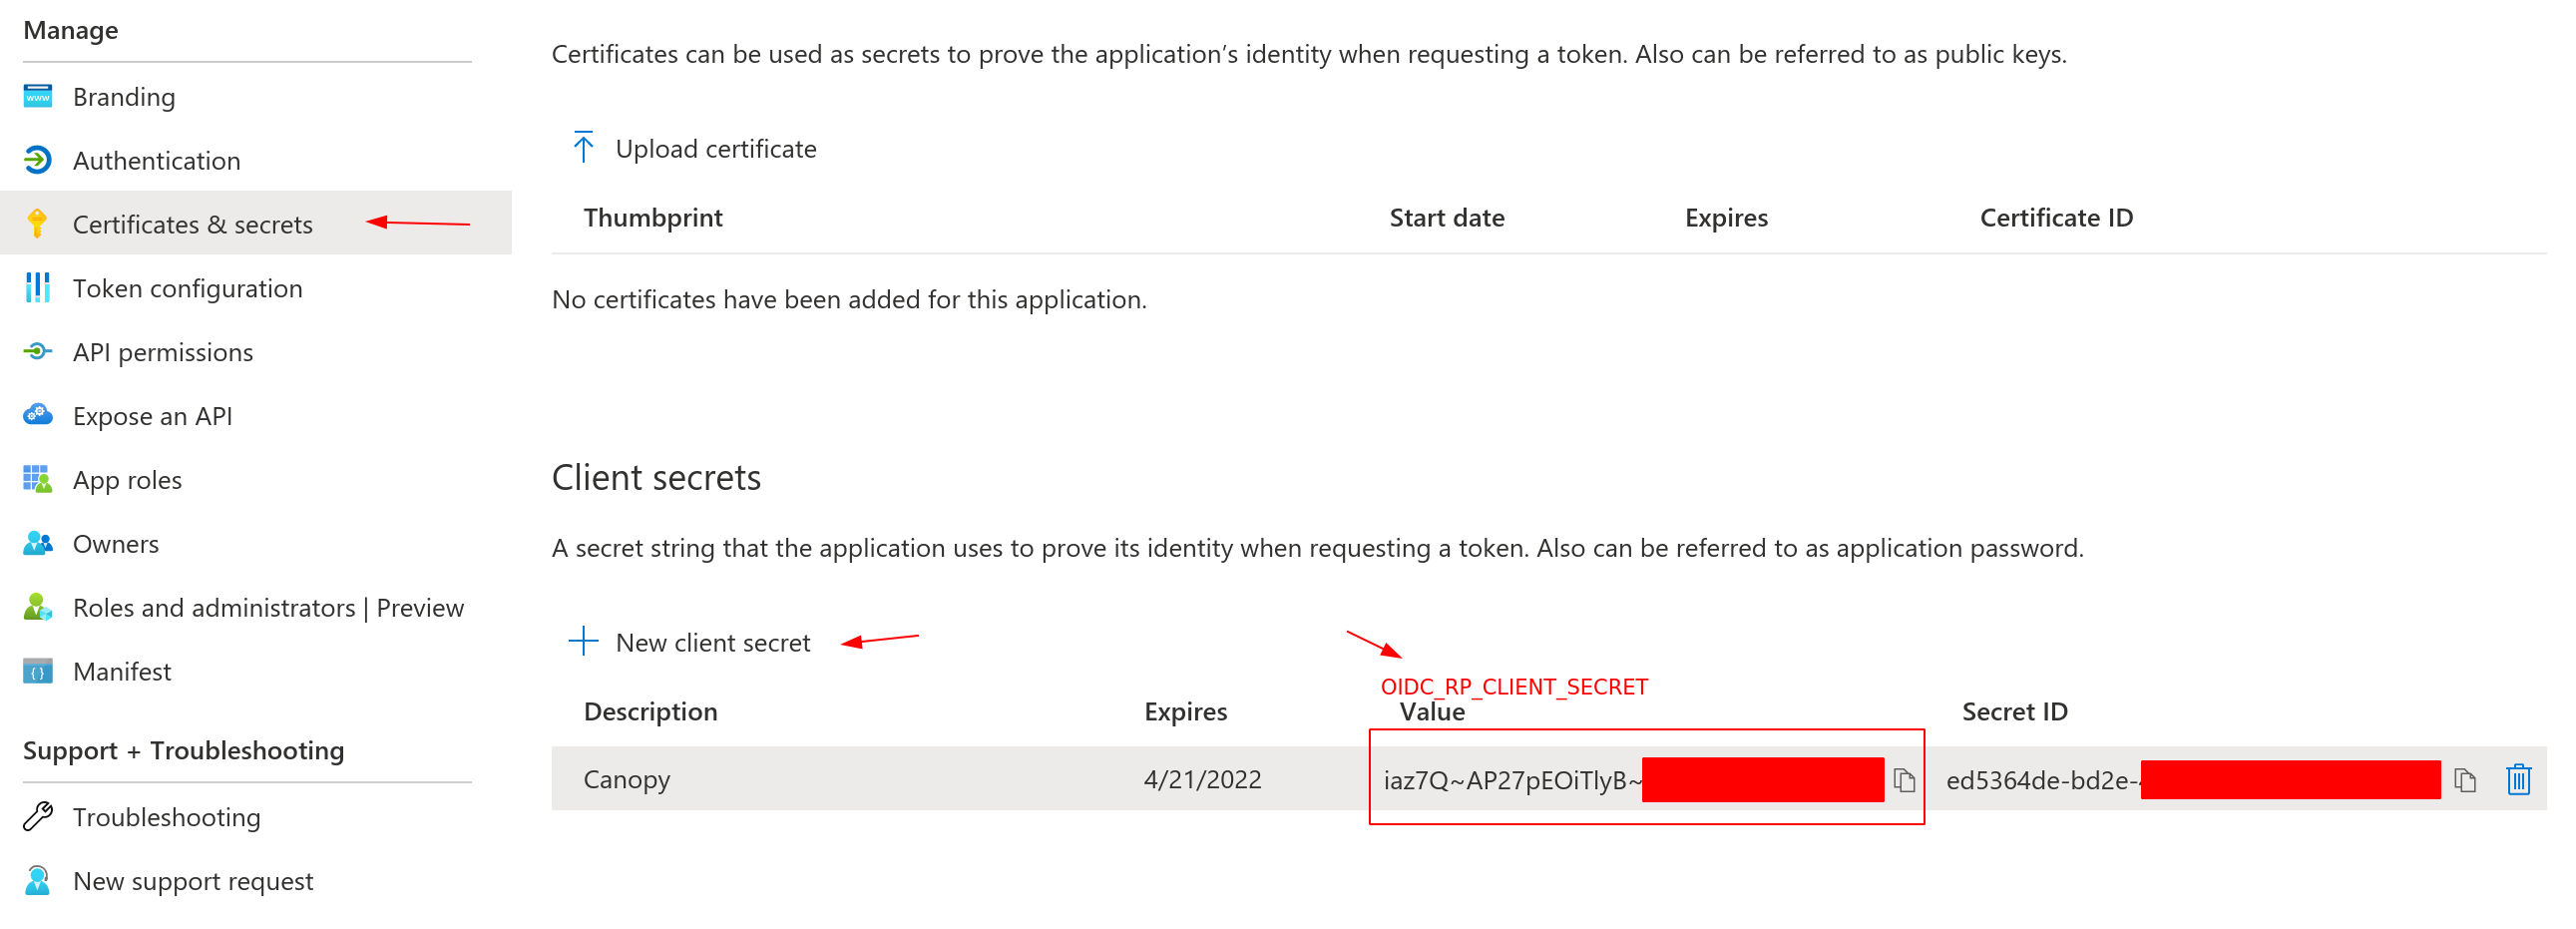
Next goto the “Certificates and secrets” subsection and create a new secret.
Take note of the secret value field, it will be used with the
OIDC_RP_CLIENT_SECRET setting.
Step 3 - Record the Application (client) ID and Directory (tenant) ID
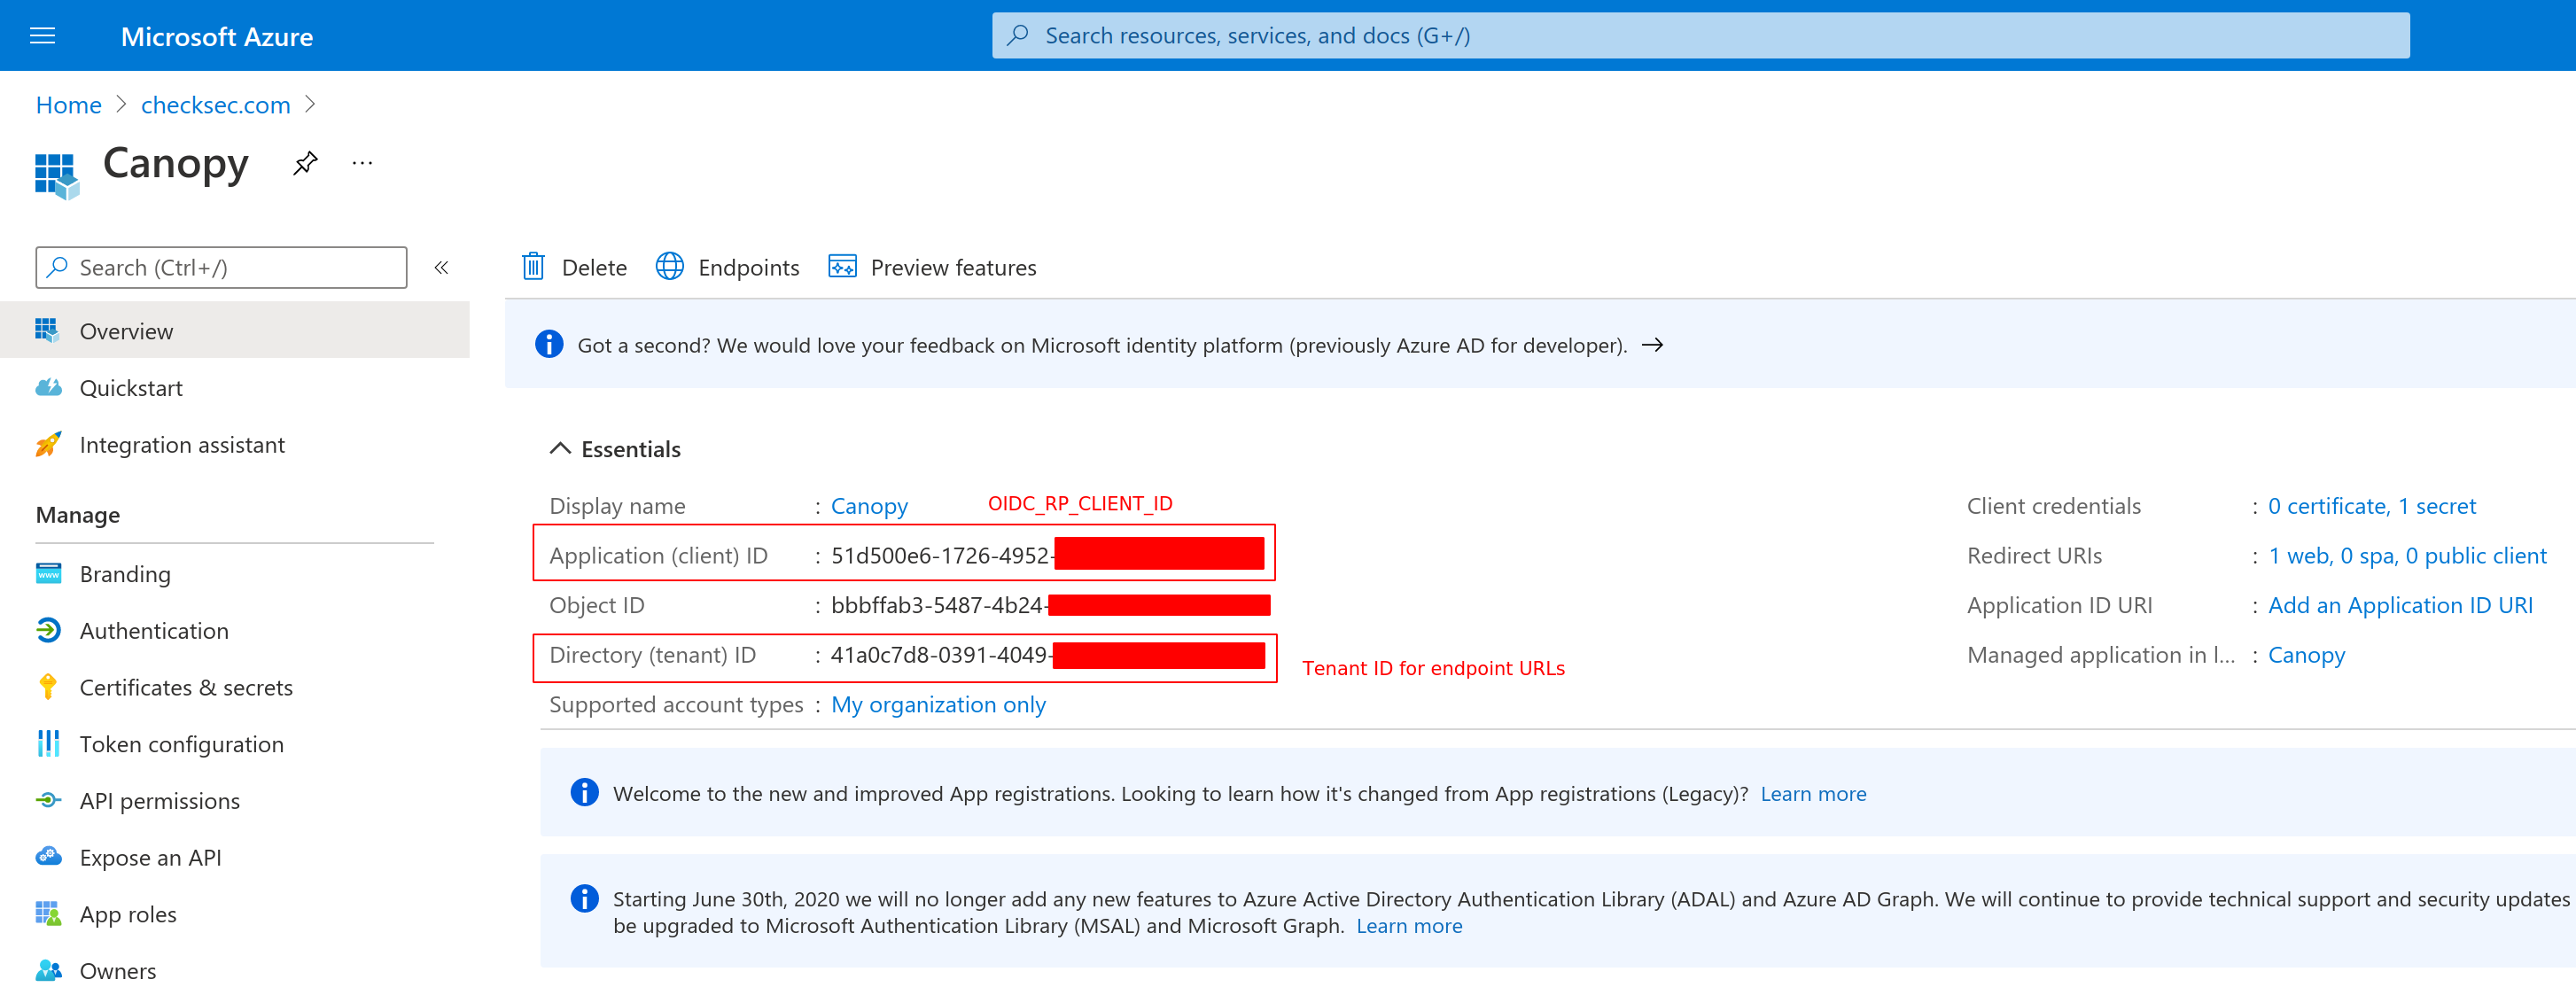
Navigate back to the “Overview” section and take note of the Application
(client) ID and Directory (tenant) ID identifiers. Application
(client) ID identifier will be used as the OIDC_RP_CLIENT_ID setting and
Directory (tenant) ID identifier will be used inside of the endpoint URLs
(See example config)
Step 4 - Configure the Canopy service
Copy the example config lines below to your /etc/canopy/canopy.ini file.
You will need to replace all the values inside the angle brackets with the
values you recorded in the previous steps.
Restart the Canopy service via systemctl restart canopy and attempt to
login via SSO.
There will likely be attribute mapping issues as you start to map user fields
and groups. These issues can be debugged using the LOG_LEVEL_OIDC=DEBUG
setting and by viewing the Canopy logs journalctl -u canopy -e
Example Microsoft Entra ID Configuration
OIDC_ENABLE=true
OIDC_SSO_NAME=Microsoft Entra ID
OIDC_RP_CLIENT_ID=<APPLICATION (CLIENT) ID>
OIDC_RP_CLIENT_SECRET=<SECRET VALUE>

OIDC_OP_JWKS_ENDPOINT=https://login.microsoftonline.com/<TENANT_ID>/discovery/v2.0/keys
OIDC_OP_AUTHORIZATION_ENDPOINT=https://login.microsoftonline.com/<TENANT_ID>/oauth2/v2.0/authorize
OIDC_OP_TOKEN_ENDPOINT=https://login.microsoftonline.com/<TENANT_ID>/oauth2/v2.0/token
OIDC_OP_USER_ENDPOINT=https://graph.microsoft.com/oidc/userinfo

OIDC_FETCH_USERINFO=true
OIDC_RP_SCOPES=openid profile
OIDC_ATTRIBUTE_MAPPING=name=name,email=unique_name

#Remove after testing
LOG_LEVEL_OIDC=DEBUG
How to configure Windows ADFS 2016
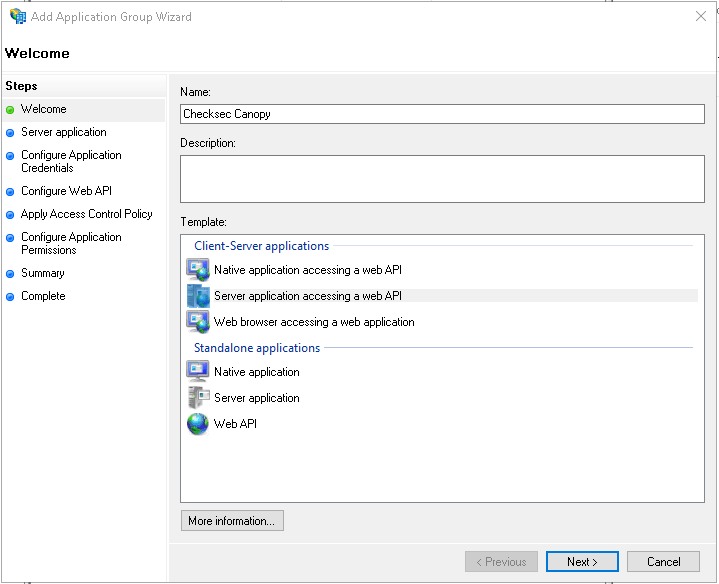
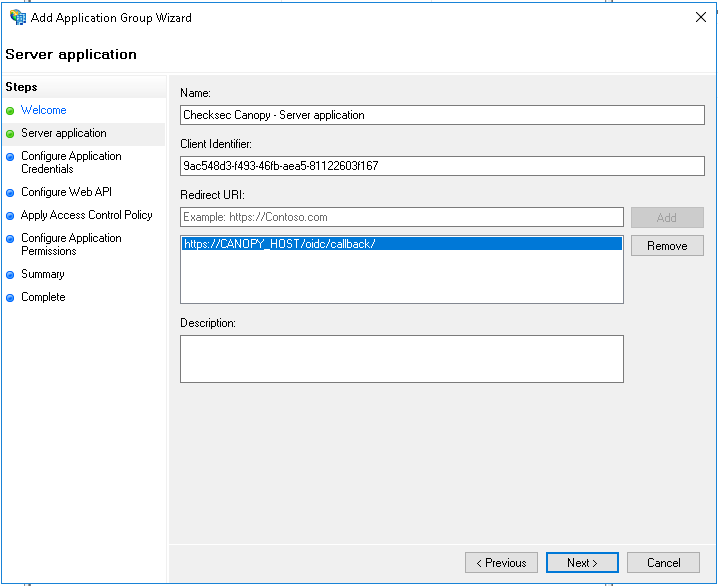
Step 1 - Create an Application Group
From the ADFS Management console, in the Application Groups section, create a new Application Group of type*Server Application accessing a web API*.
Step 2 - Set callback URL and take note of client identifier
Add the Canopy callback URL, it is https://CANOPY_HOST/oidc/callback/ Copy the generated Client Identifier, it is your OIDC_RP_CLIENT_ID
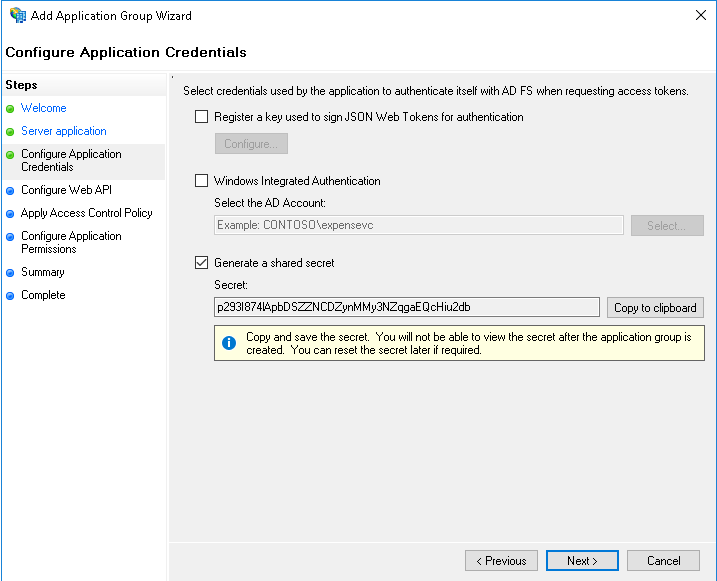
Step 3 - Generate a shared secret and copy to clipboard
Generate a shared secret and copy it also, it is your OIDC_RP_CLIENT_SECRET
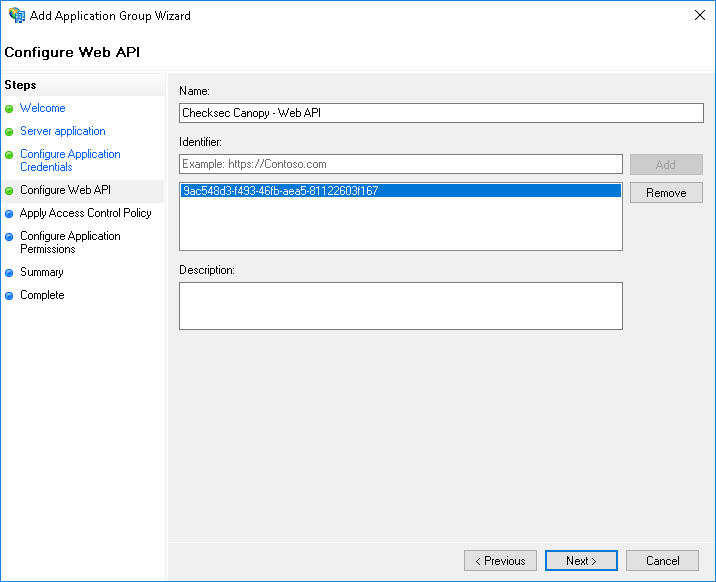
Step 4 - Set the Web API identifier
For the Web API identifier, please use the Client Identifier from step 1.
Step 5 - Select who should be allowed to authenticate
Select who should be allowed to authenticate.
Step 6 - Select the scopes
Ensure the openid and allatclaims scopes are selected.

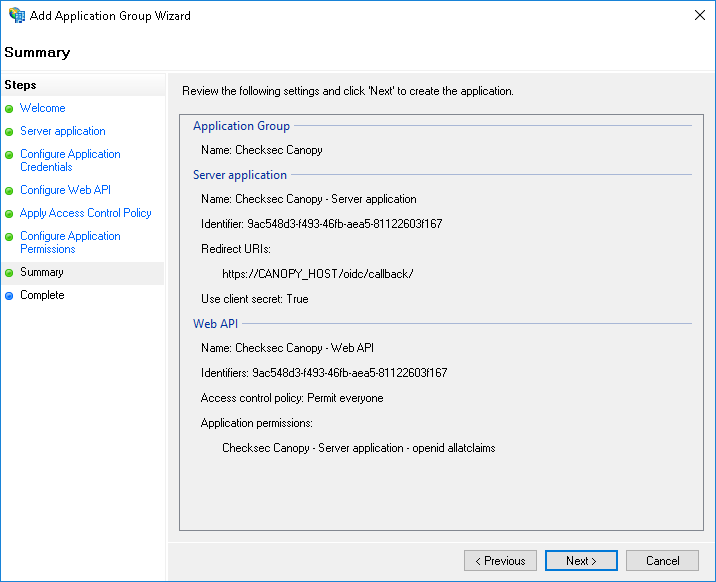
Step 7 - Review the summary
Review the summary, ensure that the identifiers are the same and that the callback URL is correct.
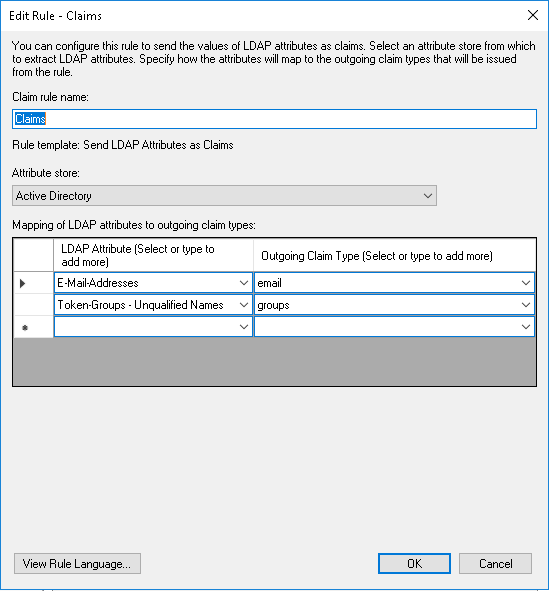
Step 8 - Add a rule to send LDAP attributes as claims
After completion of the Add Application Group Wizard, double click on the Web API and goto the Issuance Transform Rules and add a rule to send LDAP attributes as claims.
Configure at least an email claim.
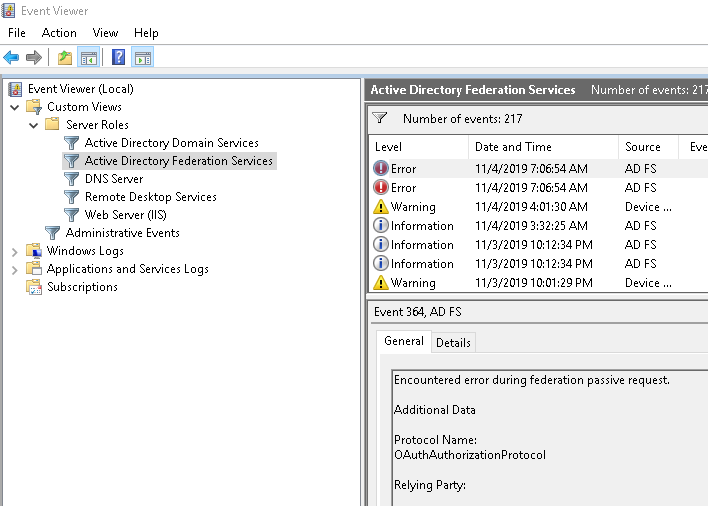
Debugging
If your ADFS present any kind of error you can consult the Event Viewer to see why.
Example Windows ADFS 2016 Configuration
OIDC_ENABLE=true
OIDC_RP_SCOPES=openid email profile allatclaims
OIDC_RESPONSE_MODE=form_post
OIDC_RP_CLIENT_ID=your_client_id
OIDC_RP_CLIENT_SECRET=your_client_secret
OIDC_OP_AUTHORIZATION_ENDPOINT=https://ADFS_HOST/adfs/oauth2/authorize/
OIDC_OP_TOKEN_ENDPOINT=https://ADFS_HOST/adfs/oauth2/token/
OIDC_OP_JWKS_ENDPOINT=https://ADFS_HOST/adfs/discovery/keys
OIDC_FETCH_USERINFO=false

OIDC_ATTRIBUTE_MAPPING=name=unique_name,email=email,set_roles=groups
SSO_USER_ROLE_MAPPING=ADFSGroup1=CanopyRole1
Example Okta Configuration
OIDC_ENABLE=true
OIDC_RP_CLIENT_ID=your_client_id
OIDC_RP_CLIENT_SECRET=your_client_secret
OIDC_OP_AUTHORIZATION_ENDPOINT=https://YOUR_BASE_URL.okta.com/oauth2/default/v1/authorize
OIDC_OP_TOKEN_ENDPOINT=https://YOUR_BASE_URL.okta.com/oauth2/default/v1/token
OIDC_OP_USER_ENDPOINT=https://YOUR_BASE_URL.okta.com/oauth2/default/v1/userinfo
OIDC_OP_JWKS_ENDPOINT=https://YOUR_BASE_URL.okta.com/oauth2/default/v1/keys
OIDC_FETCH_USERINFO=true

OIDC_ATTRIBUTE_MAPPING=name=name,email=email,set_roles=groups
SSO_USER_ROLE_MAPPING=OKTAGROUP1=CanopyRole1
Configuration Options
Settings |
Description |
Default |
|---|---|---|
OIDC_ENABLE |
Enable OIDC authentication |
false |
OIDC_CREATE_USER |
Create non-existent users |
true |
OIDC_RP_CLIENT_ID |
Client Identifier of Relying Party |
|
OIDC_RP_CLIENT_SECRET |
Client Secret of Relying Party. This or OIDC_RP_CLIENT_ASSERTION_PEM must be set. |
|
OIDC_RP_CLIENT_ASSERTION_PEM |
Client certificate path/filename for |
|
OIDC_OP_AUTHORIZATION_ENDPOINT |
URL of OIDC authorization endpoint |
|
OIDC_OP_TOKEN_ENDPOINT |
URL of OIDC token endpoint |
|
OIDC_OP_USER_ENDPOINT |
URL of OIDC userinfo endpoint |
|
OIDC_OP_JWKS_ENDPOINT |
URL of OIDC jwks endpoint |
|
OIDC_RP_SIGN_ALGO |
Algorithm with which tokens are signed: RS256 or HS256 |
RS256 |
OIDC_RP_IDP_SIGN_KEY |
Signing key for HS256 algorithm |
|
OIDC_VERIFY_SSL |
Verify TLS certification during back channel communication with OP |
true |
OIDC_TIMEOUT |
Timeout for back channel communication with OP |
|
OIDC_PROXY |
Proxy to use for back channel communication with OP |
|
OIDC_RP_SCOPES |
Scopes to request. openid is required. |
openid email profile |
OIDC_SSO_NAME |
Name to display for SSO login on login screens |
OpenID Connect |
OIDC_FETCH_USERINFO |
Should userinfo endpoint be queried for additional claims, required for opaque access tokens. |
false |
OIDC_MERGE_ALL_CLAIMS |
Should claims contained in all JWT tokens be merged |
true |
OIDC_JWKS_CACHE_TIMEOUT |
Timeout in seconds of JWKS key cache |
3600 |
OIDC_RESPONSE_MODE |
Response type used by OP when calling Canopy’s callback URL. |
|
OIDC_AUTH_REQUEST_EXTRA_PARAMS |
Additional parameters to set in authentication request. Comma separated list of key=value pairs. e.g. “resource=MY_RESOURCE_NAME” for MS-OAPX/MS-OIDCE |
|
OIDC_VALID_AUDIENCES |
Override generated list of valid AUD/audience values for access token. Defaults to OIDC_RP_CLIENT_ID and optionally the ‘resource’ value in OIDC_AUTH_REQUEST_EXTRA_PARAMS. Comma separated list. |
|
OIDC_ATTRIBUTE_MAPPING |
Mapping of claims to user attributes |
email=email |
Debugging
All the required information to debug OIDC interaction will be logged under the Canopy process when the LOG_LEVEL_OIDC is set to DEBUG.
In /etc/canopy/canopy.ini set:
LOG_LEVEL_OIDC=DEBUG
restart Canopy service and attempt a login.
Consult Canopy logs for information regarding the login process, claim to attribute mapping and role mapping.
journalctl -u canopy -e
Proxy Configuration for OIDC
When Canopy is deployed in an environment that requires a proxy to access external services, you’ll need to configure proxy settings for OIDC authentication to work properly. The OIDC authentication process requires Canopy to make outbound connections to the identity provider.
For instructions on how to configure proxy settings and other environment variables for Canopy services, see the Configuring a Proxy or other environmental variables section in the installation guide.